This is an old revision of the document!
Creating a Grievance
Grievance Type and Category

Type
The Type dropdown lists the available grievance types. These options are defined in the Settings: Grievance Types page. This field is mandatory.
Category
The Category dropdown lists the available grievance categories.
The appearance, visibility, and the listed options in this field is dependent on the chosen Type (the previous field).
 For example, if “Cross Cutting” was selected as the Type, this Category field becomes a “tag” field, allowing you to assign multiple categories. Clicking on the field will list all the categories, and choosing an item on the list will accept the entry as a tag. You can remove each tag by clicking on the “x” button beside it.
 As another example, if “Environment Related” was selected as the Type, this Category field becomes a dropdown. The options listed in the dropdown are limited only to which is relevant to the “Environment Related” type, i.e. “Environmental Management” and “Health and Safety” are the only listed categories. You can narrow down the list by clicking and typing on the gray field between the dropdown and the listed options.
All options listed here as categories are defined in the Settings: Grievance Categories page. This field is mandatory.
PAP Details

Name
Type the name of the Project-Affected Person (PAP) in this field.
Date of Birth
Type the birth date of the PAP in this field. You can choose to manually type in the date using the YYYY-MM-DD format, or choose the date from the calendar that pops up when you click on the field.
Gender
Choose the gender of the PAP in this field. The options available are:
- Prefer not to say
- Male
- Female
- Others
DAP / IAP
Choose if the PAP is a directly affected person (DAP) or indirectly affected person (DAP) in this field. This field is mandatory.
Vulnerabilities
Choose if the PAP has any vulnerabilities in this field. You can only choose one. The options available are:
- Persons with Disabilities
- Indigenous People
- Pregnant Women
- Senior Citizen
- Minor
Address
Type the PAP's full address in this field.
Type the PAP's e-mail address in this field.
Mobile No.
Type the PAP's mobile number in this field. There is no restriction in the number format, i.e. it can be 09123456789 or +639123456789.
Other Contact Details
If the PAP has any other contact details (e.g. landline number, etc.), you can type it here.
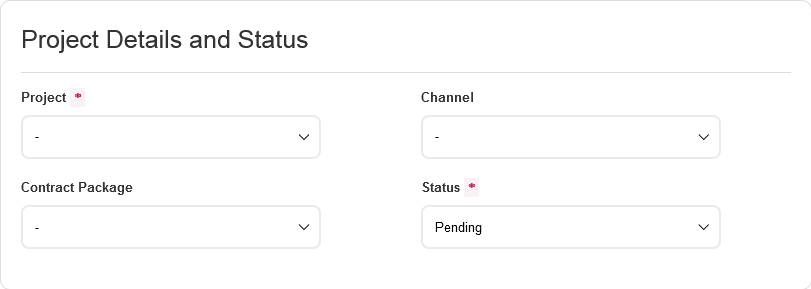
Project Details and Status

Project
Set the point project in this field. You can narrow down the list of options by using the gray search field between the dropdown field and the options list. Options listed here as projects are defined in the Settings: Projects page. This field is mandatory.
Segment
If “N2SC” is selected in the Project field, this additional field will appear. You need to select the project segment of N2SC that is involved in this project.
Contract Package
Set the contract package in this field. You can narrow down the list of options by using the gray search field between the dropdown field and the options list. Options listed here as contract packages are defined in the Settings: Contract Packages page.
Channel
Set the grievance channel in this field. You can narrow down the list of options by using the gray search field between the dropdown field and the options list. Options listed here as channels are defined in the Settings: Grievance Channels page.
Status
Set the grievance status in this field, choosing between “Pending” and “Closed”. This field is mandatory.
Grievance

Control # and Ticket ID
When creating a grievance, the Control # and Ticket ID will automatically be generated by the system. These field also cannot be changed when editing a grievance.
Date Received
Set the date when this grievance was received. You can choose to manually type in the date using the YYYY-MM-DD format, or choose the date from the calendar that pops up when you click on the field. This field is mandatory.
Date / Time Encoded
Set the date and time when this grievance was encoded. You can choose to manually type in the date using the YYYY-MM-DD hh:mm format, or choose the date and time from the calendar that pops up when you click on the field. This field is mandatory.
Description
Type the description of the concern / complaint in this field. This field is mandatory.
Affected Address
Type the full address of the grievance's affected location in this field.
Photo
Using this field, you can upload a photo to attach to this grievance. Click on “Browse…”, choose the photo you wish to attach, and click “OK”. If successful, the uploaded file's filename will appear above the field. Saving the form will attach the uploaded photo.
Latitude / Longitude
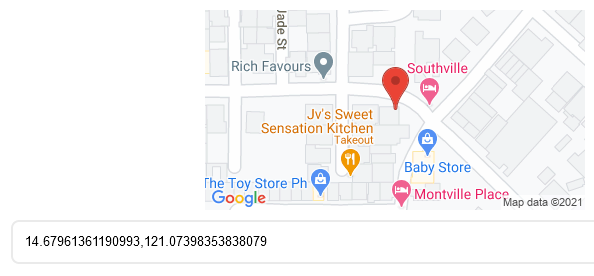
A latitude and longitude of the location can be added to the grievance. It accepts a latitude / longitude combination separated with a comma and a space, e.g. “12.9495715,123.8779507”. The first value is the latitude while the second value is the longitude.
How to Get the Latitude / Longitude of a Location?
When editing a grievance, and if you or a different user has added a latitude & longitude on the grievance, it will appear here with a preview of the actual location in a small Google Maps image.

Summary and Action Taken

Summary
Type a summary of this grievance in this field.
Action Taken
Type a conclusive action taken into this field.
Involved Officers
 In this section, you need to assign officers to handle the grievance, and if necessary, who to escalate it to. You need to assign at least a Helpdesk Officer in this section.
 When editing/updating a grievance, you will see the date and time the officer was assigned to the grievance.
You can also reassign officers as you see fit. When you do so, the displayed “date/time assigned” will also update to reflect when that officer was reassigned to the grievance.
GRM / Helpdesk Officer
Choose a user to assign as the Helpdesk Officer for this grievance. Only users with roles that have “Helpdesk Officer” access are listed here. This field is mandatory, which means you need to assign at least a Helpdesk Officer to each grievance.
As of 2021-03-10, these roles are namely:
A Level 1 GRM receives, logs in, and resolves at most immediate time and level possible, the grievance or complaint filed by the PAP. This will either be at the local level (through Local Help Desks or community-driven platforms such as Tumpukans), or at the “central” (i.e., DOTr) level. Complaints received at Level 1 may be through in-person means (e.g., a local grievance redress office), or through other online channels (mediated through website, social media, SMS technology).
Level 2 Officer
Choose a user to assign as the Level 2 Officer. Only users with roles that have “Level 2 Officer” access are listed here.
As of 2021-03-10, these roles are namely:
A Level 2 GRM receives and resolves complaints not resolved at Level 1 and will require dedicated environmental or resettlement-action response by existing Project governance structures (e.g., Local Housing Board, Regional Environmental Management Bureau, etc.)
Level 3 Officer
Choose a user to assign as the Level 3 Officer. Only users with roles that have “Level 3 Officer” access are listed here.
As of 2021-03-10, these roles are namely:
A Level 3 GRM receives and resolves complaints not resolved at Level 2.
Involved Offices
 This last section in the Details page prompts you to choose the offices to be tagged in the grievance.
LGU
In this field, choose the local government unit (LGU) to assign this grievance to.
Office Lodged
In this field, choose the local office to assign this grievance to.
Generate a Summary
 When viewing or editing an existing grievance, a “Generate Summary” button will be present. Clicking this will allow you to download a general summary of the grievance in a Microsoft Word document format.
Saving the Grievance
 Once all the necessary and/or mandatory fields have been filled, you can save the form by scrolling back up on the page and clicking on the “Save” button. If the form is successfully sent to the system, it will show a popup stating the successful action.
If, however, some mandatory fields have been left unset, tooltips will appear below each field in red, stating the issue.

Alternatively, you can choose to discard the form by clicking on the Back button. This takes you back to the Grievances list page.
